 To celebrate Food Day Canada on July 30th, as well as the Civic Holiday weekend, we are having a contest! Please send us a picture of your favourite "Food Day Canada" recipe using all local ingredients that you (or your kids!) made, and we'll post it here on our blog, as well as on Facebook and Twitter (@OntarioHEA). Don't forget to use the hashtag #MakeItHomegrown on Twitter, and we'll retweet you. One lucky winner will be chosen to receive a signed copy of Homegrown, as well as an OHEA apron. Deadline: August 5th, 2016. Need inspiration? Try some of these delicious recipes, and start cooking! All recipes below excerpted from “Homegrown: Celebrating the Canadian Foods We Grow, Raise and Produce”, by Mairlyn Smith. Reprinted with permission from Whitecap Books, 2015. Grilled Peaches 6 ripe juicy local peaches (see note below) 2 Tbsp (30 mL) canola oil or melted unsalted butter 1 tsp (5 mL) cinnamon 1/2 tsp (2 mL) nutmeg 3/4 cup (185 mL) ricotta cheese 1/3 cup (80 mL) liquid honey Ingredient Note: Peaches—If your peaches are still firm, place them on the counter at room temperature and they should ripen within a few days. Refrigerate ripe peaches and eat them within a week of purchase. Not a fan of peaches? Use nectarines. METHOD 1. Preheat barbecue to high. If you forgot to do so the last time you barbecued, clean the grill with a wire brush. 2. Rinse peaches and pat dry. Slice in half from top to bottom following the natural crease. Twist apart to reveal 2 halves and use a paring knife or soup spoon to remove pits. 3. Stir together oil (or melted butter), cinnamon and nutmeg in a small bowl. Brush peach halves with mixture. 4. Cook cut-side down until grill marks appear, about 5 minutes. Flip over and grill skin-side for another 3 to 5 minutes until slightly charred. 5. Remove peaches from the grill and serve immediately in individual bowls with 1 Tbsp (30 mL) of ricotta cheese and approx. 1 tsp (5 mL) of honey drizzled on each. Kick-Ass Barbecued Burgers 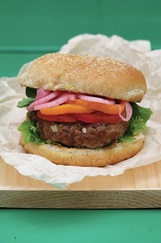 2 lb (900 g) medium ground beef (see note) 1 onion, grated or finely diced (see note) 2 cloves garlic, minced 1 omega-3 egg 1/4 cup (60 mL) 100% whole wheat breadcrumbs or Panko crumbs 1 Tbsp (15 mL) Worcestershire sauce 1/4 tsp (1 mL) iodized salt 1/4–1/2 tsp (1–2 mL) freshly ground pepper METHOD 1. Crumble beef in a large bowl. Add onion, garlic, egg, breadcrumbs (or Panko crumbs, if using), Worcestershire sauce, salt and pepper. Combine gently but thoroughly. Divide meat mixture into 8 equal sized balls and gently shape into 3/4-inch (2 cm) thick patties. Make a shallow depression in the centre of each patty to keep patties from puffing up during cooking. 2. Preheat barbecue on high. Place patties on and reduce heat to medium-high (400°F/200°C). Cook for 5 to 7 minutes per side, testing doneness with a digital rapid-read food thermometer inserted sideways into centre of each patty; burgers are completely cooked when thermometer reads 160°F (71°C). Ingredient Notes: Medium Ground Beef—If you are wondering what makes this Kick-Ass Burger worthy of its name, taste the difference that medium ground makes vs lean beef. With only a 6 percent difference in fat content compared to lean ground beef, the difference is well worth it. Onion—Grating the onion on a box grater helps to incorporate it better into the patty so there are no ‘alien bits’ that young picky eaters might take offense. Best Burgers 101 • Manage the meat gently when forming the patty to make patties more tender—compressing the patty makes it more dense, which makes it seem tougher. • Don’t press on your patty while grilling, this presses juices out. • The patty is ready to flip on the grill when you see meat juices rising to the surface. • Making patties ahead and refrigerating them helps them hold together better on the grill and makes for a better flavour. • Keep your tools and hands clean between handling raw and cooked meat—soap and water does the trick. PHEc Tip: Skip the cheese and bacon on this burger, you won’t need any more bells and whistles. The burger stands on its own, just add condiments. Pickled Red Onions 1 large red onion (see note) 2/3 cup (160 mL) white vinegar 1/4 cup (60 mL) granulated sugar 1/2 tsp (2 mL) iodized salt 1. Peel and thinly slice red onion. If you have a mandolin, use it, if not slice the onion really thinly and ask Santa for a mandolin for Christmas. 2. Separate rings and place onions in a clean 2-cup (500 mL) Mason jar. 3. In a small saucepan or large glass microwave-safe measuring cup, combine vinegar, sugar and salt. Bring to a boil. Remove from heat and stir to dissolve sugar. Pour over onion slices into the Mason jar. 4. Cool to room temperature, then cover and refrigerate. Will keep up to 1 month refrigerated. Ingredient Note: Red Onion—Don’t be tempted to use a different onion; the flavour of the red onion along with the rest of the ingredients is a marriage made in Onion Heaven. 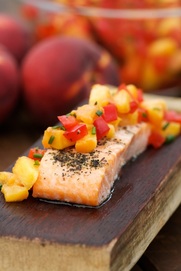 Salmon with Peach Salsa
Peach Salsa (makes approximately 2 cups/500 mL) 1 large ripe juicy peach, peeled and diced 1/2 red pepper, diced 1 ripe tomato, diced 1/2 cup (125 mL) finely chopped chives 1 Tbsp (15 mL) liquid honey 1 Tbsp (15 mL) apple cider vinegar 1/4 tsp (1 mL) iodized salt Pepper to taste Salmon 1 lb (450 g) fresh or frozen farmed Canadian salmon fillets, cut into 4 equal pieces 1/2 tsp (2 mL) dried basil 1/4 tsp (1 mL) freshly ground black pepper 1 Tbsp (15 mL) unsalted butter, melted METHOD 1. To make the salsa, toss together peach in a small bowl with the red pepper, tomato, chives, honey, vinegar, salt and pepper. Cover and refrigerate for at least 30 minutes to develop the flavours. Salsa can be made up to 2 hours before serving. 2. Preheat oven to 450°F (230°C). Line a rimmed baking sheet with parchment paper or foil. Place salmon on the baking sheet and set aside. 3. Combine basil and pepper in a small bowl. Brush salmon with butter and sprinkle with the basil/pepper mixture. Depending on thickness of the fish, bake for 10 to 15 minutes or until it flakes when prodded with a fork. Do not overcook. 4. When salmon is done, transfer each fillet to a plate and top with ½ cup (125 mL) of the Peach Salsa.
2 Comments
 On June 27th, The Ontario Home Economics Association, Mairlyn Smith, P.H.Ec., and Produce Made Simple had a very successful Twitter party to promote our cookbook, Homegrown, as well as local Ontario produce. It was a fun and informative event, and we were happy to see some of our members joining us.
The hashtag, #LoveLocalON, was trending Top 5 during the Twitter party, with much local food discussions and recipes from the 116 Twitter followers who RSVP'd for the evening event. As you can see from the Twitter analytics infographic here, we had a social media reach of close to 400,000 people! A big Thank You goes out to our in-house media expert, Sandra Venneri, P.H.Ec., who took time out of her already busy schedule to "Tweet" for @OntarioHEA that night. We hope to have more OHEA members join us next time! Don't forget to follow us on Twitter @OntarioHEA By Jan Main, P.H.Ec.
Strawberries are ready just in time for Canada’s birthday. (Perhaps we should have a strawberry on the flag – they are certainly one of the most popular fruits.) If you are a die-hard picker, one who is out in the field on the first day and several more times during the picking season, you will have an abundance of this luscious, seductive fruit to enjoy, first, picked in the hand, then in pies, tarts, muffins, jam, and plenty left over to freeze for winter enjoyment. With all this sunshine, the berries should be especially sweet. There is no better way to capture the sweetness of the berries than to use them as soon after they are picked as possible, either in a recipe or frozen for future enjoyment. Easy preserving If you are lucky enough to have an abundance of strawberries, freeze them for future use. They keep well for up to a year and can be used in pies, crisps, muffins or even in preserving recipes. Consider making strawberry jam in the winter for a renewed taste of summer. To freeze, simply wash in cool water, remove hulls, pat dry with a towel and arrange berries in a single layer on parchment paper-lined baking sheets. Freeze until hard (four hours or overnight) then pack in freezer bags, filling each with 4 to 6 cups (1 to 1-1/2 L) berries. Date and label each bag. Return to freezer ready for a future recipe. Orange shortbread pastry This recipe is designed for those intimidated by the very thought of making homemade pastry. It takes virtually minutes with never-fail results and no rolling. 1-1/2 cups (375 mL) all-purpose flour 2 tbsp (30 mL) granulated sugar 1 tbsp (15 mL) grated orange rind 1/2 tsp (2 mL) salt 1/2 cup (125 mL) cold butter Pre-heat oven to 400°F (200°C). Spray a 9-inch spring-form pan with baking spray or a 10-inch pie plate with baking spray. In a mixing bowl, stir together flour, sugar, rind and salt using a fork. Using a pastry blender or two knives, cut butter into pastry mixture until the size of a small crumb. Press crumbs over the bottom and ½ inch (1.5 cm) up the side of pan. Line the pie shell with parchment paper and weight with several cups of rice to bake pastry blind (that is to bake a pastry without a filling, but weighted so that it does not bubble up). Bake until a pale golden colour, about 15 minutes. Using both hands, gently remove parchment paper and empty used rice into jar for future pastries. Discard parchment paper. Cool pastry on rack. Cheesecake and berry filling This filling will be sublime with any berry, sliced plums or peaches later in the season. Mascarpone cheese is a high fat cheese with a mild, rich taste ideal for fruit, available in the cheese section of the supermarket. 1 cup (250 mL) 8 oz mascarpone cheese or cream cheese 1/3 cup (80 mL) sifted icing sugar 1 tbsp (15 mL) grated orange rind 6 cups (1-1/2 L) fresh strawberries or other seasonal berry or fruit Sprigs of mint While pastry is cooling, beat cheese, sugar and rind together until smooth. Spread evenly over bottom of cooled pastry. Cover and refrigerate. For best results, pastry should be made and served the same day. Berries taste best at room temperature. Spoon berries into pie and garnish with mint just before serving. Makes six mouth-watering servings. By Jan Main, P.H.Ec. From her regular column, The Main Menu, in the Beach Metro News Statistics tell us that when it comes to what’s really cooking in the kitchen, most have 10 to 15 recipes in their repertoire and rotate them ad nauseum. While this research may infer there is boredom in the kitchen, there’s more to it than meets the frypan. Finding recipes all the family will enjoy is one challenge, what with individual preferences, downright fussy eaters, vegetarian teens, and yes, let’s not forget healthy and tasty. Then there is the issue of time - or rather the lack of it. According to those same statisticians the average time spent preparing and cooking dinner is 20 minutes or less.
Organizational specialists suggest stocking the pantry and the freezer with a stealth-like hoarding mentality. The reality is, we often find ourselves staring at shelves bulging with packages of rice, pasta and beans, or frozen hunks of chicken or stewing beef, often in a Zen-like trance after a wild day at the office. What we really need are some short-order supper survival tips that offer variety with few ingredients and minimal time and effort. Well, here to the rescue are the culinary cavalry, so to speak, fighting kitchen boredom with little-time, no-whine recipes. These busy professional home economists, with culinary skills at their very capable fingertips, face the same stresses as the typical Canadian family - juggling jobs, kids, and the family’s car pool pick up schedule. Barb Holland, P.H.Ec. is a freelance Professional Home Economist and recipe developer. While many envy her home office - the kitchen is steps away and commuting non-existent, variable schedules are her personal juggling act. Holland finds it disconcerting how many people take the route of fast food, take-away and restaurant meals. All can be tough on the waistline and the wallet. Her super-quick recipe is based on that hoarded pasta and a jar of pesto. Barb’s Warm Pesto Pasta Salad When summer tomatoes are at their best, toss a quick meal together with a jar of prepared pesto. While this pasta salad can be made with the more traditional basil pesto, you could also use arugula pesto with fresh arugula for a very peppery kick. 12 oz. (375 g) rotini pasta ½ cup basil (or arugula) pesto (or more to taste) 1 bunch fresh arugula 1 large ripe tomato, chopped or 8 cherry tomatoes, quartered Bring a large pot of water to a boil and cook pasta until tender. Wash arugula, spin dry and remove stems. Drain pasta (don’t rinse) and place in large bowl. Toss with pesto. Add arugula leaves and tomato, toss again and serve. Makes 4 servings. Ellie Topp, P.H.Ec., is the co-author of nine cookbooks including “The Complete Book of Small-Batch Preserving, 2nd edition” by Ellie Topp and Margaret Howard, Firefly Books, 2007 and "Fresh and Healthy Cooking for Two - Easy Meals for Everyday Life" by Ellie Topp and Marilyn Booth, Formac Publishing, 2011. Ellie’s Barbecued Pork Tenderloin with Soy-Mustard Sauce Lean pork tenderloin grills to perfection in short order for an easy meal. If the grill is not handy, simply roast it in the oven. Serve with couscous and steamed broccoli for quick dishes to round out the meal. 1 lb. (500 g) pork tenderloin(s), 1 or 2 1/4 cup soy sauce 1/4 cup grainy Dijon mustard 1/4 cup honey 1 clove garlic, minced Trim any visible fat and membrane from meat. Combine remaining ingredients. Pour over meat, turning to coat thoroughly. Set aside. Preheat barbecue to high and lightly oil the grill. Place meat on grill and reduce heat to medium-high. Turn meat and brush with sauce frequently until outside is caramelized but inside still pink, about 10-12 minutes. Alternatively, bake in 375F oven for 40 minutes or until meat has just a hint of pink remaining. Slice and serve immediately. Makes 4 servings. Couscous with Lemon and Fresh Herbs Couscous with a hint of lemon and fresh herbs is a perfect accompaniment to pork. Garnish with currants or sunflower seeds if you desire. In small saucepan heat 2 tsp. vegetable oil over medium heat; cook 1 minced shallot until soft, about 2 minutes. Add 1-1/2 cups chicken broth and bring to a boil. Stir in 1 cup couscous and grated rind of 1 lemon. Remove from heat, cover and let stand for 5 minutes. Stir in 2 tbsp. chopped fresh herbs such as basil, oregano, thyme or rosemary or 1 tsp. dried. Diane O’Shea, P.H.Ec., is a professional home economist and Family Studies (Home Economics) educator. Days are kept busy as a secondary school teacher, department head and Family Studies lecturer at the Faculty of Education, Western University. Now retired from O'Shea's Farm Fresh Vegetables and Berries, there is time for the four children, their spouses and three grandkids. Diane is presently busy planning for the Canadian Symposium for Home Economics and Family Studies Educators in February 2017. Here she shares her favourite topping for seasonal fruit. Diane’s Strawberries ‘N’ Cream O’Shea fell in love with strawberries and Devonshire cream during a trip to England many years ago. The O’Shea farm proudly produced summer and day neutral strawberries for over 20 years. This is her Greek yogurt-based alternative. While similar to Devonshire cream in consistency, this recipe provides a delicious richness with the bonus of being low in fat. Enjoy the berries and all the seasonal Ontario fruits coming to the markets with this simple topping. And, it’s short order, too! 2 cups fresh strawberries, hulled and sliced or other seasonal fruit Topping: 2 cups low fat, Greek-style natural yogurt 3 tbsp. granulated sugar 1 tbsp. lemon juice or 1 tsp. almond extract Combine yogurt, sugar and lemon juice or almond extract. Spoon over fresh berries or fruit. Garnish as desired. Makes 4 servings. |

The Ontario Home Economics Association, a self-regulating body of professional Home Economists, promotes high professional standards among its members so that they may assist families and individuals to achieve and maintain a desirable quality of life. Categories
All
Archives
April 2024
|

 RSS Feed
|
Subscribe to our mailing list
|
|
Unsubscribe from our mailing list
|
Copyright © 2023 Ontario Home Economics Association (OHEA). All Rights Reserved.